
Last updated on May 25th, 2024 at 08:19 am
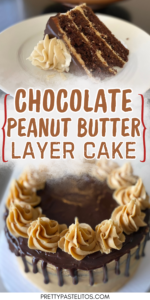 If you’re anything like me, finding the time to bake a homemade cake from scratch can sometimes feel like a luxury we can’t afford. But what if I told you that you could whip up a gourmet cake at home with the ease of a cake from a box mix? Enter this chocolate peanut butter layer cake from a box mix, a heavenly combination of rich chocolate and creamy peanut butter, all simplified for those of us with a jam-packed schedule.
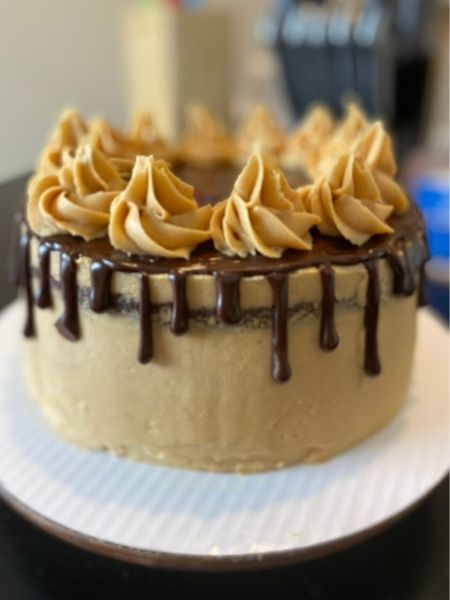
Using a chocolate cake mix as our secret weapon, we transform a simple baking project into an exquisite dessert that rivals any birthday cake recipe you might find in a fancy bakery. Imagine layers of moist chocolate cake, each slathered with decadent peanut butter frosting, creating a dessert that perfectly balances the indulgence of chocolate and peanut butter. It’s a boxed cake mix hack that feels anything but basic, yielding results that will have your friends and family convinced you’ve been hiding your professional baking skills all along.
Jump to Recipe
Ingredients for Chocolate Peanut Butter Layer Cake
We’re about to embark on a delicious journey to create an Easy Chocolate Cake masterpiece, transforming a simple chocolate cake mix into a gourmet-level Chocolate Peanut Butter Layer Cake that’s bound to impress at any party. It’s a simple baking recipe perfect for any birthday, making a homemade cake feel like you’ve brought the bakery home. So, let’s dive into the much-anticipated ingredient list to kick things off!
Boxed Chocolate Cake:
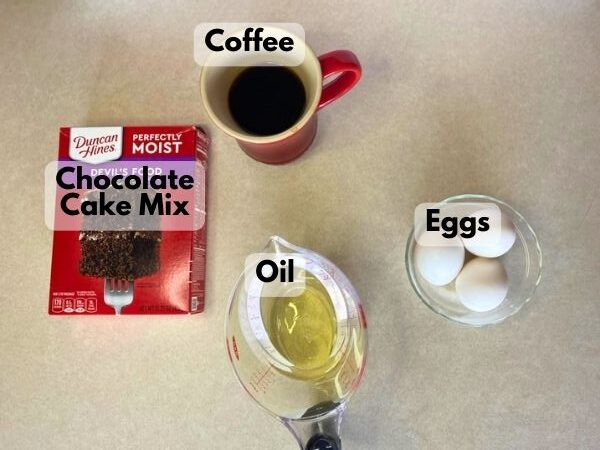
- Chocolate cake mix of your choosing
- 1 cup of coffee (Or however much water your cake mix calls for)
- ½ cup oil (Or however much oil your cake mix calls for)
- 3 eggs (Or however many eggs your cake mix calls for)
Peanut Butter Frosting (x2 for whole cake):

- ½ cup butter, softened
- 1 cup peanut butter
- 2 cups powdered sugar
- 2-3 tablespoons milk (or heavy whipping cream)
Chocolate Ganache:
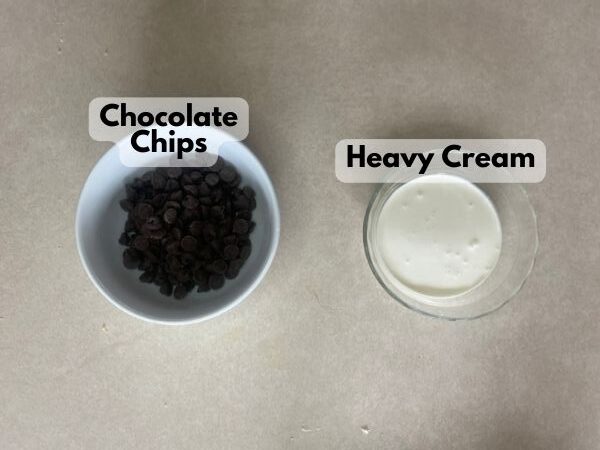
- 1 cup semisweet chocolate chips
- ½ cup heavy whipping cream
There you have it! With ingredients that are easily accessible, you’re well on your way to creating a peanut butter dessert that’s as delightful to eat as it is simple to make.
Tools Needed for Cake Decoration
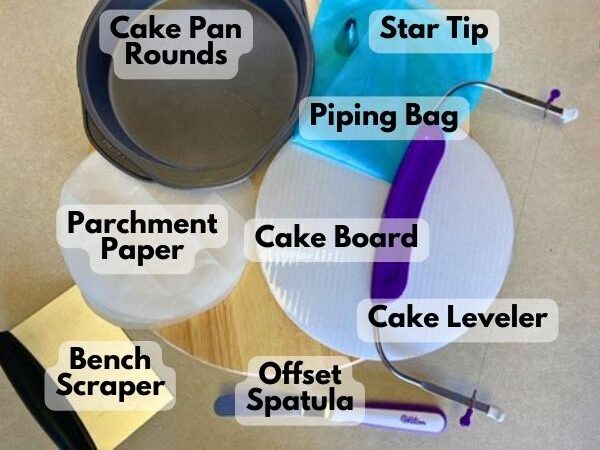
Parchment paper cut to the shape or your pan – You really, really want to line the bottom of your pan with parchment paper and grease your pan as well. It absolutely sucks to go through the effort of baking a delicious cake, and then having it fall apart when you try to get it out of the pan. You also want your parchment paper cut to fit your pans. If you don’t want to buy parchment paper in that particular shape, just place your pan on top of a sheet of regular parchment paper and lightly trace around the bottom with a pencil. Then, use scissors to cut out the part you traced and voila: parchment paper that’s the right size and shape
Cake Leveler- This is a tool that you can kind of use as a “saw” to cut off the top, rounded portion of your cake layers. You want those layers nice and flat! If your layers aren’t perfectly even, you risk your cake being lopsided when it’s all done.
Cake Board- I highly recommend you get a cake board. You can buy them at most craft stores for pretty cheap. The board is like the foundation that you will build your cake up on. You want a firm and perfectly flat foundation for your cake, and a cake board is the easiest way to achieve that.
Lazy Susan- A lazy susan or turntable is fantastic for easy access to all sides of your cake while decorating. I won’t say it’s “necessary,” but it’s pretty useful! I have a cheap lazy susan that I just stick my cake stand on, and it works fine.
Offset Spatula- An offset spatula is your best friend for spreading frosting smoothly and evenly. I usually refer to it as a “flat spatula,” but the technical term is “offset.”
Bench Scraper- A bench scraper helps achieve that perfect frosting finish by creating a clean edge around the outside of your cake.
Piping Bags and Tips- If you plan to add decorative elements like rosettes or swirls, you’ll need piping bags and tips. They’re also handy for adding extra filling between the layers. I use a piping bag with no tip for filling in the center and outside edges, and then a star tip for decorating the top of the cake.
How to Make and Decorate Chocolate Peanut Butter Layer Cake from a Box Mix
Video Showing How to Make and Decorate Chocolate Peanut Butter Layer Cake:
Prepare Your Chocolate Cake Mix
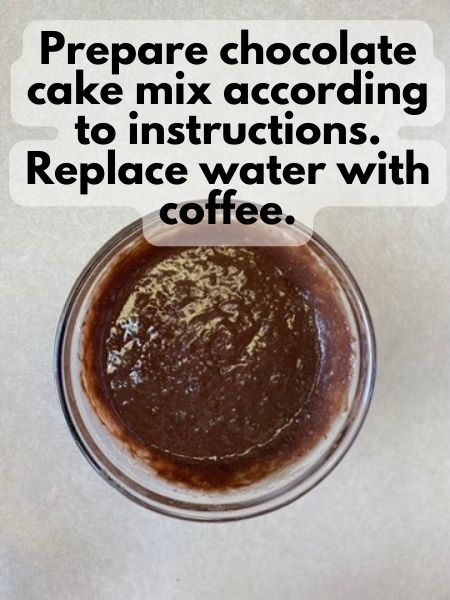
1. Prepare your chocolate cake mix according to the instructions with one exception: I always replace the water in my chocolate cakes with coffee. The coffee really brings out the chocolate flavor.
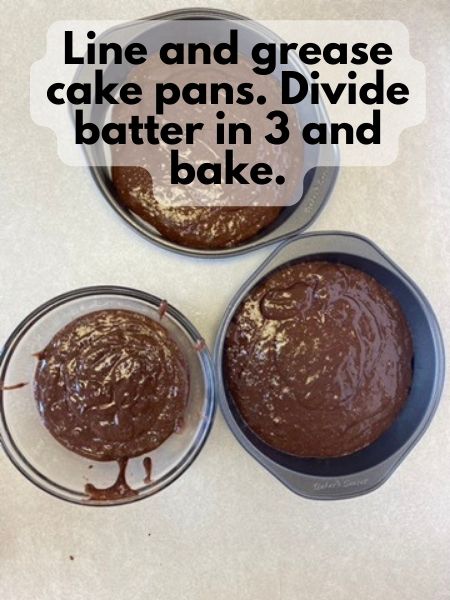
2. Divide up your batter between 3 round cake pans. I usually use a measuring cup to make sure it’s divided up evenly. Also, if you don’t have 3 cake pans like me, you can bake 2 rounds at a time and then the third round when the first 2 cool.
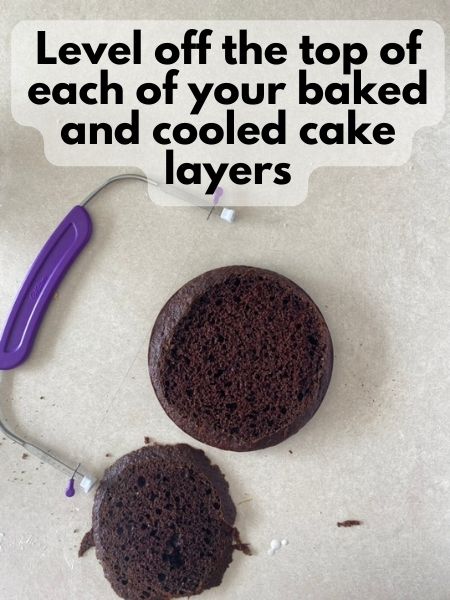
3. After your cake rounds are baked and cooled, use a cake leveler to level off just the top of each layer. If you use only 1 chocolate cake mix, you don’t want your layers to be too thin, so avoid cutting off too much.
Make Peanut Butter Frosting and Crumb Coat
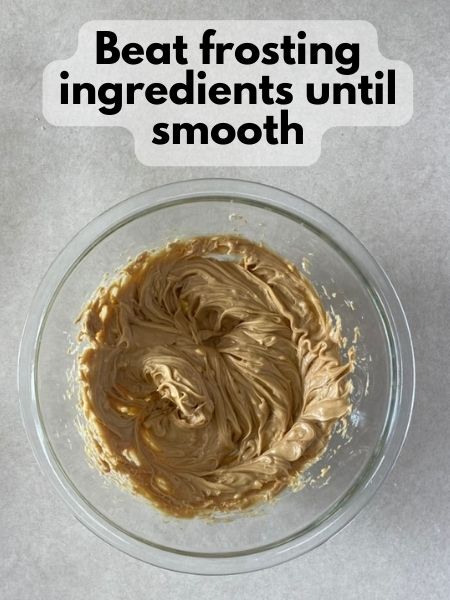
1. Make 1 batch of frosting by beating together all the frosting ingredients until smooth. If your frosting seems too thick, add milk a tablespoon at a time until you have your desired texture. You do want your frosting to be easily spreadable, which usually means adding a bit more milk.
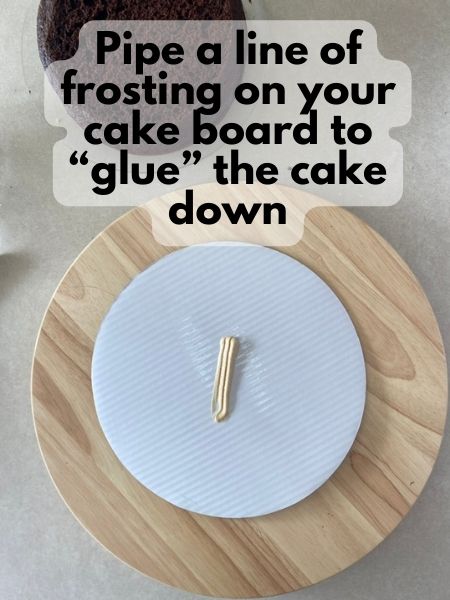
2. Put a small line of frosting on your cake board. This will “glue” your bottom cake layer to the cake board.
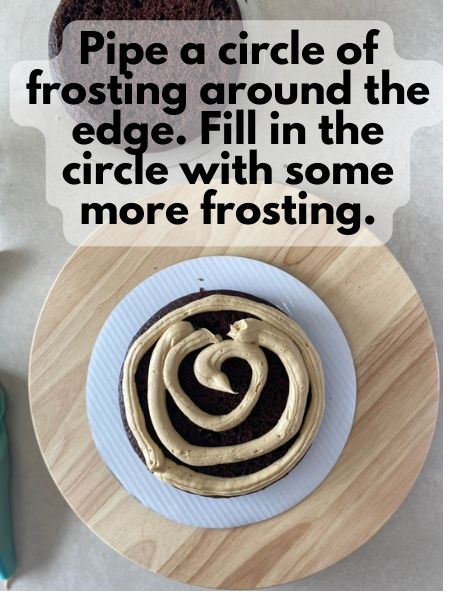
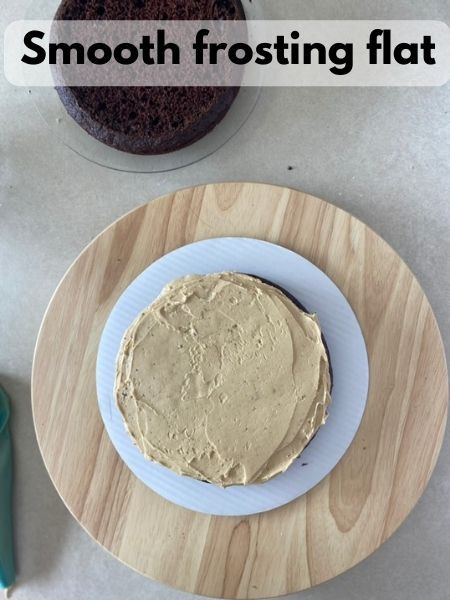
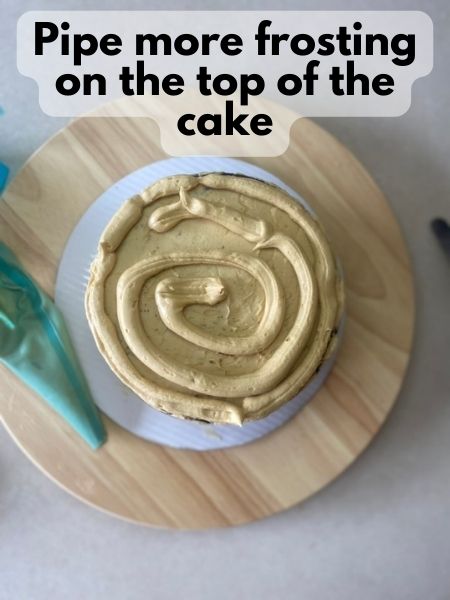
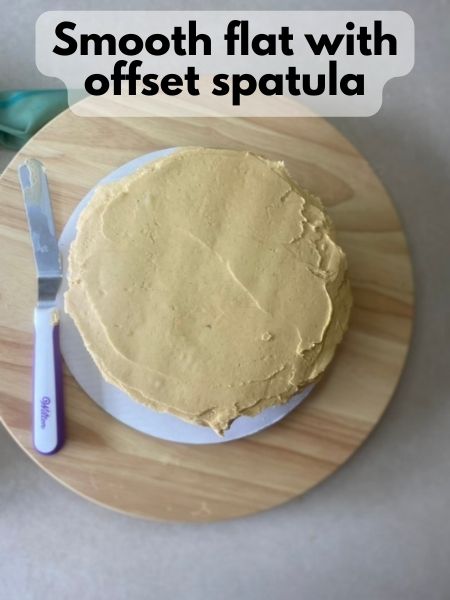
3. Place your bottom cake layer on the cake board. Pipe a circle of frosting around the edge of the cake round. Fill in the circle with some more frosting. Smooth the frosting flat with an offset spatula.
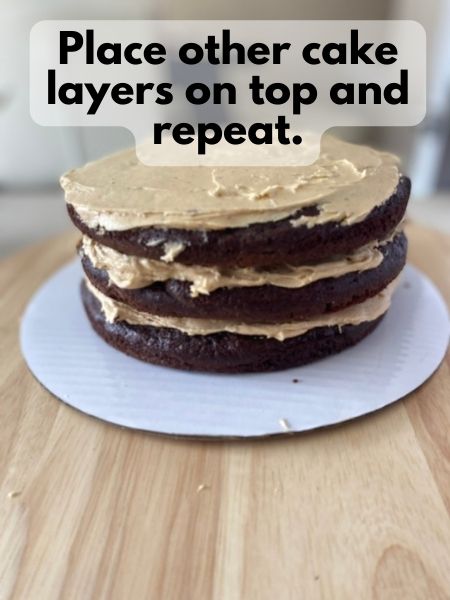
4. Put your second cake round on top of the first. Pipe a circle of frosting around the edge and fill in the circle with frosting. Smooth flat with an offset spatula.
5. Repeat this one more time with the third cake round.
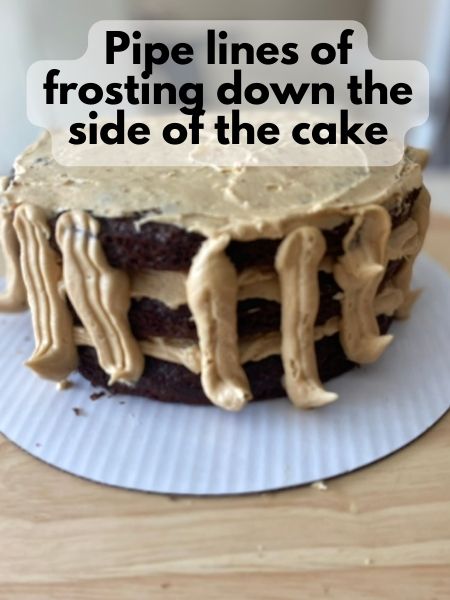
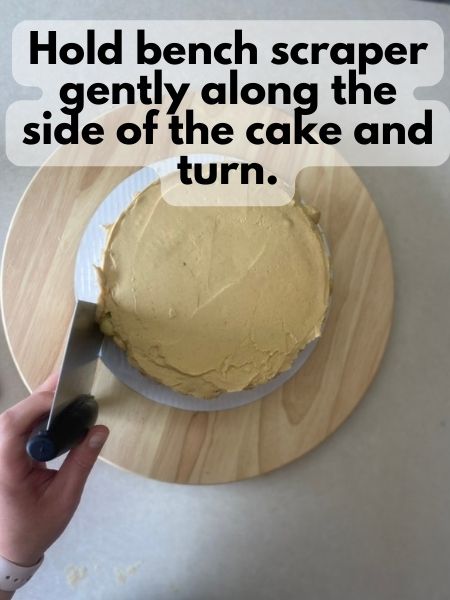
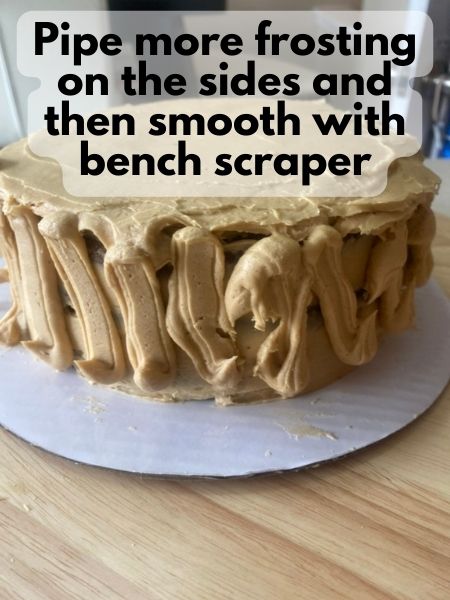
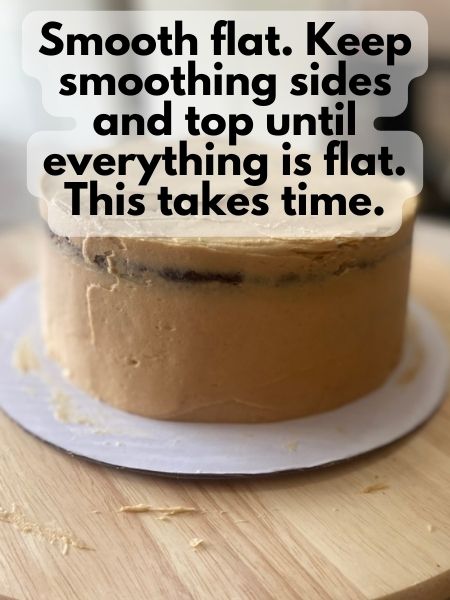
6. Pipe some straight frosting lines down the sides of your cake. Carefully, place your bench scraper along the side of the cake. Turn the cake while holding the bench scraper steady to smooth the frosting around the sides. You may need to give it a few turns.
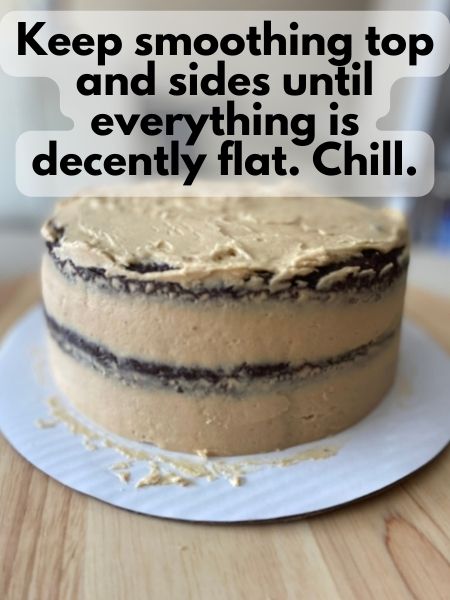
7. Smooth the top again if you have to. Keep smoothing the sides and top until everything is smooth. It’s okay if some cake is showing through!
8. Chill your cake in the fridge for an hour or the freezer for 30 minutes. Longer is also fine.
Add Last Layer of Frosting and Decoration
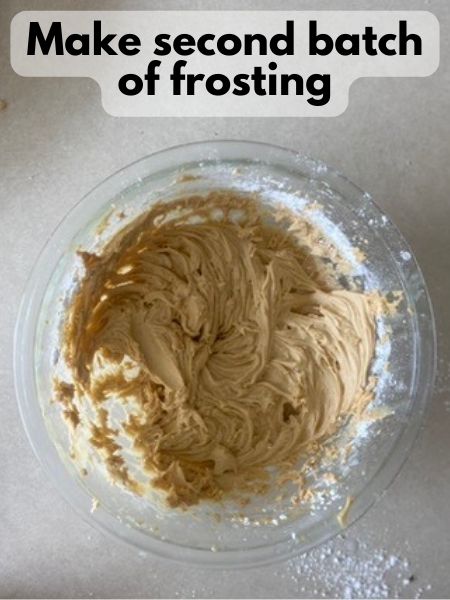
1. Make a second batch of frosting. For now, you can put your frosting in the piping bag with no tip.
2. Make another circle of frosting around the top of your cake and fill in with a little frosting.
3. Smooth the frosting on the top of the cake flat
4. Pipe more frosting down the sides of your cake. Use the bench scraper to smooth the frosting. You just want a slightly thicker layer of frosting for this one.
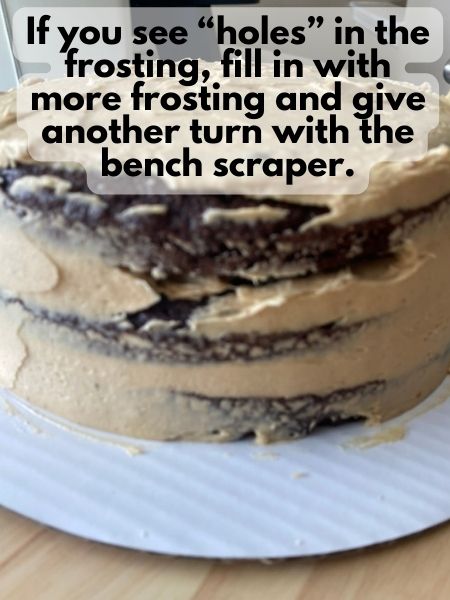
5. Look for any “holes” in the frosting on the sides and fill them in with more frosting. Then, smooth flat. Repeat this process until the sides are smooth.
6. Smooth the top of the cake flat too, as needed. Chill your cake again in the fridge for 30 minutes or the freezer for 15 minutes.
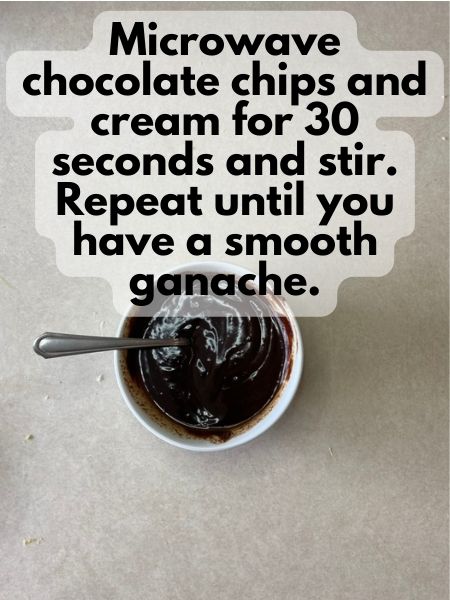
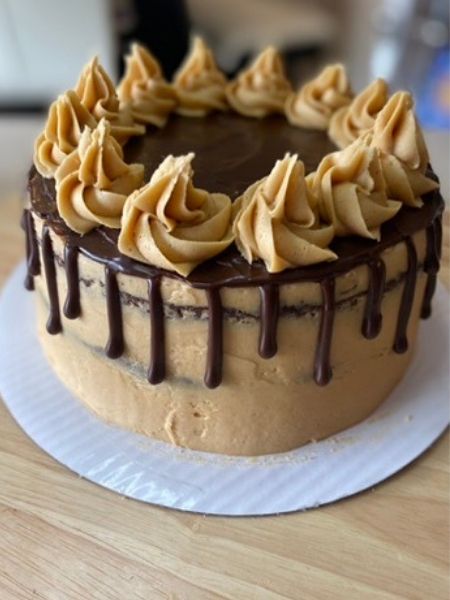
7. Make ganache by microwaving chocolate chips and cream for 30 second increments. Stir between rounds in the microwave. Stop microwaving when you have a smooth ganache with no more chocolate chunks left.
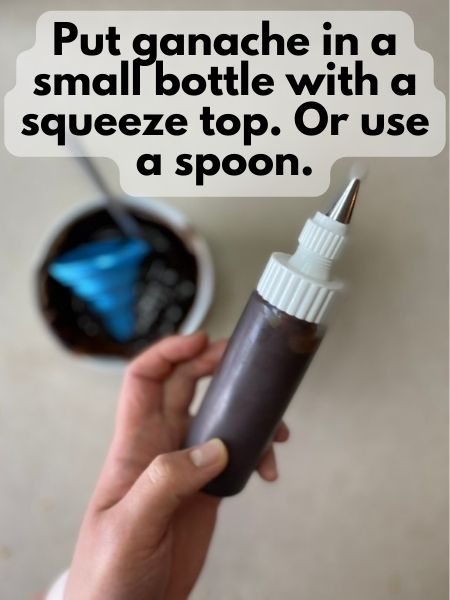
8. To create a ganache drizzle, it’s easiest if you put the ganache in a squeeze bottle with a round tip to create some drizzles down the side. I use some small icing bottles I got at Michael’s. If you don’t have something like that, you can also carefully drip some ganache around the edge of your cake with a spoon.
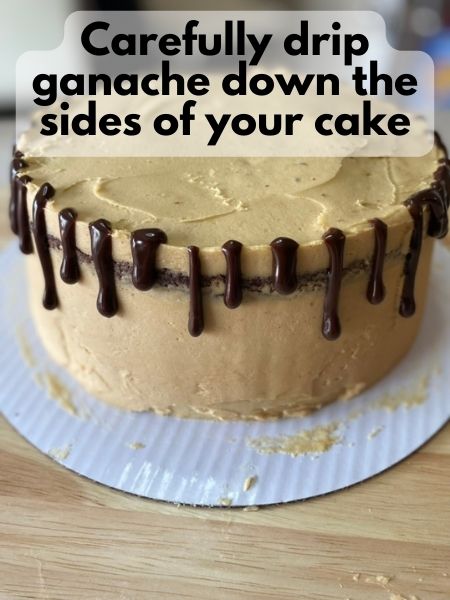
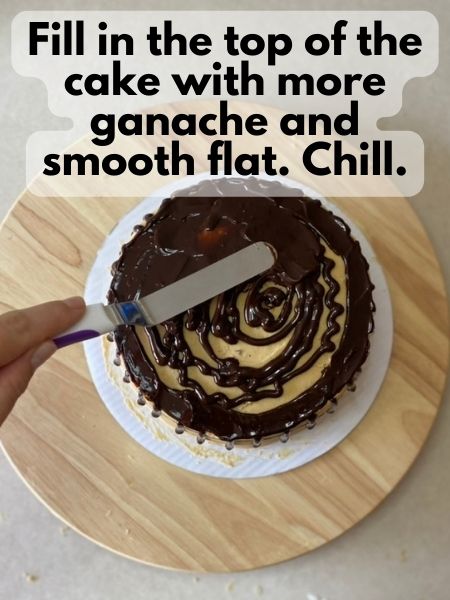
9. After you have your ganache drizzle down the sides, fill in the top of the cake with ganache. Put your cake back in the fridge or freezer to chill for a bit until the ganache is set, probably about 30 minutes.
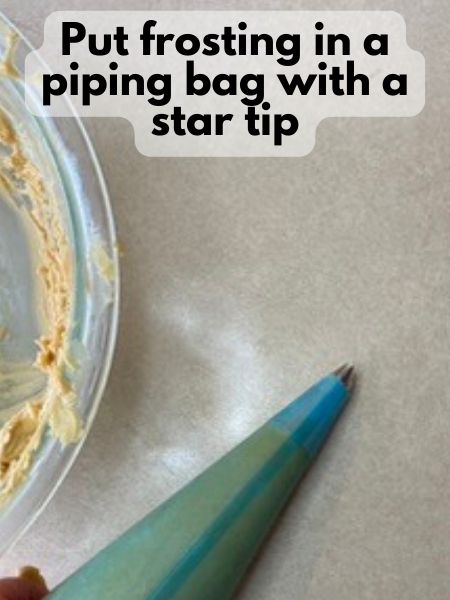
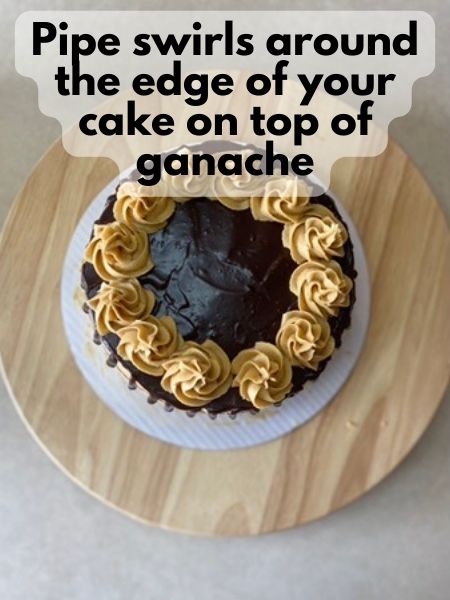
10. Put some frosting in a piping bag with a star tip. I like the Wilton 1M tip. Pipe small swirls around the top edge of your cake and admire your work.
Pro Tips
- Who doesn’t love the rich, irresistible combination of chocolate and peanut butter in a cake that looks so gourmet yet comes from a simple boxed mix? If you’re diving into this chocolate peanut butter cake adventure, let me share some nuggets of wisdom to ensure your cake is as fabulous as it can be.
- If your cake decoration skills are beginner-level, fear not: These steps seem complex, but with a little bit of patience, these techniques can work! It took me quite a few tries to learn how to do this, and that’s okay! Your cake will still taste awesome in the end!
- Make it efficient: Bake the cake layers in advance and freeze them. It might sound unconventional, but freezing the layers before assembling and frosting makes them easier to handle, prevents crumbs in your frosting, and, let’s be honest, saves you a panic on the day if you’re making this for a special occasion like a birthday. Just make sure to wrap them tightly to avoid freezer burn. If you’re making your cake only a day in advance, like I normally do, you don’t have to freeze the layers! One day won’t hurt them.
- Make your frosting smooth: It’s much, much easier to decorate a cake with frosting that’s super smooth and a little bit liquid-y. You want your frosting to hold its shape and stick to the cake for sure! However, I usually add a tablespoon or 2 more of milk for my first batch of frosting to make it easier to work with.
- Make sure your cake is chilled: I know it’s a pain!! I really do get that. If you’re in a rush, you can chill your cake in the freezer between rounds of decorating. However, I really do recommend you chill your cake at each of the spots recommended in the steps above. It makes it much easier to work with the cake.
- Don’t be afraid to take some frosting off: If worst comes to worst, you can gently scrape your frosting off the sides of your cake and start over with your second and final layer of frosting. This is also why it’s important to chill your cake! If you chill your cake between frosting steps, it’s easier to just take off one layer of frosting and chill your cake again before your try the frosting again.
Remember, the most important ingredients are patience and passion. Whether it’s for a party cake idea or just a treat for yourself, taking these steps will elevate your boxed cake mix hack to new, delicious heights.
FAQs
Remember, making this decadent layer cake recipe using a simple box mix is a fun venture into gourmet cake at home, even if you’re just starting out!
- Can I use any brand of chocolate cake mix for this recipe? Yes, you absolutely can! I prefer the Duncan Hines mixes because they are a little “bigger” than the Betty Crocker mixes. However, I’ve used Betty Crocker mixes for similar layer cakes and they came out perfectly fine. Just follow the modifications in the tutorial for that rich, moist texture that partners perfectly with the peanut butter frosting.
- Is there a substitute for peanut butter in the frosting? If you’re allergic to peanuts or simply not a fan, consider using almond butter or cashew butter for your frosting. The aim is to maintain that creamy consistency and nutty flavor that complements the chocolate so well. Just be mindful of potential allergies if you’re serving this at a party!
- How should I store the leftover cake? This cake keeps well in the refrigerator for up to 5 days. Just make sure it’s covered properly to prevent the cake from absorbing any fridge odors or drying out. When you’re ready for another slice, let it sit at room temperature for a bit to ensure the frosting softens up nicely.
- Can I make this cake ahead of time? Absolutely! You can bake the cake layers a day in advance, cool them, and then wrap them up tightly to keep them moist. The day of serving, you can just assemble and decorate. It’s a great way to manage your time, especially if you’re planning for a birthday or a gathering.
I hope these tips encourage you to dive into creating your own homemade cake masterpiece, turning a simple boxed cake mix hack into a stunning and delicious treat that is sure to impress. The goal is to enjoy the process and relish in the joy of baking, no matter your skill level. Now, let’s get our aprons on and start baking!
If you liked this Chocolate Peanut Butter Layer Cake from a box mix, check out:
Fruity Pebbles Layer Cake (From a box mix)
Butterscotch Marshmallow Layer Cake (From a box mix)
Chocolate Cake with Bailey’s Frosting (From a box mix)
Chocolate Peanut Butter Layer Cake from a Box Mix
Equipment
- 2 Piping bags 1 will work fine, but you may want to wash it in between rounds of frosting
- 1 Star piping tip I like the Wilton 1M tip
- 1 cake board
- 3 round cake pans
- 3 pieces of parchment paper cut to fit your cake pans
- 1 cake leveler
- 1 offset spatula
- 1 bench scraper
- 1 squeeze top bottle for ganache optional
- 1 lazy susan or turntable optional
Ingredients
Chocolate Cake
- 1 chocolate cake mix
- 1 cup coffee replace water your cake mix calls for with coffee, it might not be 1 cup exactly depending on the mix you use
- 1/2 cup oil or however much oil your cake mix calls for
- 3 eggs or however many eggs your cake mix calls for
Peanut Butter Frosting (x2 for whole cake)
- 1/2 cup butter softened
- 1 cup peanut butter smooth
- 2 cups powdered sugar possibly more to adjust for texture
- 2-3 Tbsp milk or heavy cream (possibly more to adjust for texture)
Chocolate Ganache
- 1 cup semisweet chocolate chips
- 1/2 cup heavy whipping cream
Instructions
Make Cake
- Prepare your chocolate cake mix per the box instructions but replace any water with coffee (The coffee brings out the flavor of the chocolate)
- Line your cake pans with parchment paper and grease them
- Divide cake batter evenly in 3 and bake
- Cake is done when a toothpick inserted comes out clean. Allow your cake rounds to cool completely before leveling
- Using your cake leveler, carefully take off just the top part of each cake layer so you have 3 flat layers. Try to avoid taking off too much with the cake leveler, as your cake layers will already be thin if you only use 1 box mix.
Make Frosting and Crumb Coat Cake
- Make your first batch of frosting by beating the frosting ingredients together until smooth. If the frosting is too thick, add more milk a tablespoon at a time. If frosting is too thin, add more powdered sugar 1/4 cup at a time. You do want your frosting to be more on the thin side so it's easy to spread, but not so thin that it's dripping off your cake.
- Put your frosting in a piping bag with no tip, or with a plain round tip.
- Pipe a small line of frosting down the middle of your cake board, and place a cake round of top of that. The frosting "glues" the cake down. Place your cake board on a lazy susan or turntable if you have one.
- Pipe a circle of frosting around your cake round and then fill in the circle with more frosting. Smooth the frosting flat with an offset spatula.
- Place your second cake round on top of the bottom one. Pipe a circle of frosting and then fill in the circle with more frosting. Smooth flat with an offset spatula.
- Repeat this for the third cake round.
- Pipe some frosting in straight lines down the sides of the cake.
- Hold your bench scraper flat against the sides of your cake. Give your cake a gentle turn on the lazy susan to smooth the frosting on the sides flat.
- You may have to give the cake a couple turns to get the frosting on the sides flat. It's okay if you can see some cake through the frosting for this first layer!
- You'll also have to smooth the top of the cake again. Keep smoothing the sides and top until everything is decently flat.
- Chill your crumb coated cake in the fridge for 1 hour or in the freezer for 30 minutes.
Add Final Layer of Frosting and Decorate
- Make a second batch of peanut butter frosting. For now, put some frosting in a piping bag with no tip or a plain, round tip.
- Pipe another circle of frosting around the top of your cake, fill in the circle with more frosting and smooth it flat with an offset spatula (Just like you did with the inner layers).
- Pipe more frosting down the sides of the cake and smooth the sides with your bench scraper.
- Keep smoothing the sides and top of the cake until everything is flat. Your goal is to just add a thicker layer of even frosting all around the outside of the cake.
- Chill your cake in the fridge for about an hour or the freezer for 30 minutes.
- To make your ganache: Place your chocolate chips and cream in a microwaveable bowl. Microwave for 30 seconds and stir. Keep microwaving for 30 seconds and stir in between until you have a smooth ganache.
- Place some of your ganache in a squeeze top bottle if you have one. If not, you can use a spoon. Carefully drizzle a little bit of ganache around the edge of your cake on the fop. You don't want the drizzle going all the way down the cake, just an inch or so is fine.
- Then, fill in the top of the cake with ganache and carefully smooth it flat with an offset spatula.
- Chill your cake again until the ganache sets, probably at least 30 minutes in the fridge or 15 minutes in the freezer.
- Put some more peanut butter frosting in a piping bag with a star tip this time. I like the Wilton 1M tip.
- Pipe frosting swirls around the top edge of your cake. Chill your cake one last time before serving.